Embark on a DIY carpentry adventure and build custom shelves that perfectly suit your home’s style and needs. Transform your living space with handcrafted shelving solutions that blend seamlessly with your décor, providing both aesthetic appeal and practical storage. DIY carpentry can seem daunting, but building custom shelves is surprisingly achievable with the right knowledge and tools. This guide is designed to demystify the process, equipping you with the skills and expertise necessary to create beautiful, functional shelves. This article will guide you through each step, from planning to finishing. We’ll cover everything from material selection to assembly techniques, providing actionable insights and practical examples. Let’s dive in!
Planning Your Custom Shelving
Defining Your Needs
Before you dive into the woodworking, carefully consider your specific storage needs. Think about the items you plan to store and the amount of space you have available. A well-planned design ensures your shelving system is not just aesthetically pleasing but also truly functional. A great starting point is to take accurate measurements of the wall space you’re working with and map out a layout that accounts for the different sizes and weights of the objects that you’ll be storing. Sketch your ideas, consider the style of your home’s interior, and don’t be afraid to get creative. This thorough planning stage is crucial for a successful outcome.
Choosing the Right Materials
Selecting the right materials is paramount in achieving a sturdy and long-lasting custom shelving solution. Solid wood, particularly hardwoods like oak or maple, is known for its durability and timeless appeal. Consider factors like your budget, the desired aesthetic, and the weight capacity you need. If you’re on a tighter budget, engineered wood or plywood can also be an excellent alternative, offering strength and versatility.
Design Considerations
Now, let’s discuss design considerations. How many shelves will you need? What’s the ideal spacing between them? Do you want open shelving or closed compartments? A good rule of thumb for shelf spacing is to allow enough room for the items you’ll be storing without overcrowding the space, promoting airflow and preventing damage to items. The more you think about the layout, the more likely you’ll design your custom shelving that will look great and function perfectly. Take time to evaluate lighting and accessibility; this will influence the placement and design.
Cutting and Preparing the Wood
Precision Cutting
Accurate cuts are essential in carpentry. Use a miter saw or a circular saw for precise cuts, and consider using a measuring tape and a pencil for accurate markings on your wood pieces. This is where the precision of your initial measurements pays off, as an off-by-even-a-little-bit measurement can create issues down the line. Follow the design plans meticulously, ensuring each cut aligns with the intended measurements. Proper handling of the saw can prevent accidents and ensure the safety of yourself and the space.
Assembling the Shelves
Assembling the Frame
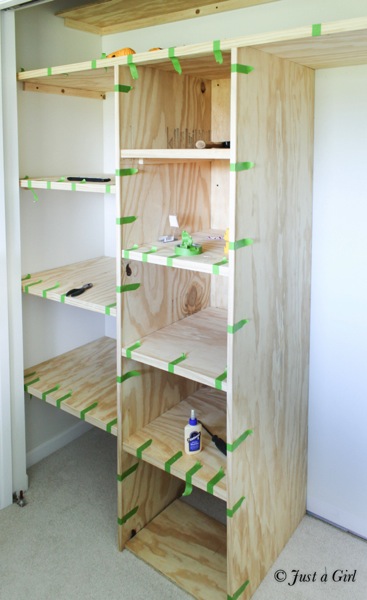
Now that your wood pieces are ready, it’s time to put them together. Start by assembling the frame of your shelves using screws, nails, or other appropriate fasteners. Precisely align the pieces to create a strong and stable structure. Use wood glue to further enhance the strength and durability of the joints. Remember that these methods will differ depending on your material and design preferences.
Finishing Touches
Finishing the Shelves
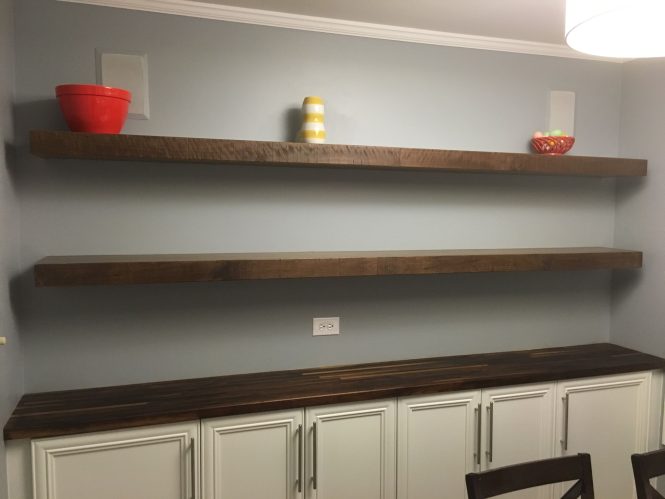
Once the shelves are assembled, give them a final touch of finishing. Sand the surfaces smooth, apply a coat of sealant, and then finish with a layer of stain or paint if desired to match your decor. This is the perfect opportunity to personalize the shelves by matching the look with your desired aesthetic. These final touches make a significant difference in the finished product, creating a high-quality and aesthetically pleasing piece.
Installation and Safety Precautions
Installing the Shelving
With the shelves completed, it’s time to install them. Ensure that the wall is suitable for mounting the shelves, and use wall anchors if necessary. This step is crucial to ensure the shelf’s stability and longevity. For added safety, consider using appropriate wall anchors for securing heavier shelves or if the wall material isn’t conducive to screws.
Additional Tips for Success
Employing Safety Measures
When working with power tools, always prioritize safety. Wear appropriate safety gear, such as eye protection and gloves, to safeguard yourself from potential accidents. Ensure that the work area is well-lit and clear of obstructions. In addition, keep children and pets away from the work area.
Maintaining Your Custom Shelves
Long-Term Care
Maintaining your custom shelves will ensure that they look great and function optimally for a long time. Wipe down shelves regularly with a damp cloth. For tougher stains, use a mild soap and water solution. To prevent damage from moisture and humidity, use a sealant or finish that protects the shelves from these external elements.
Conclusion
Advanced Techniques for Custom Shelves
Frequently Asked Questions
What are the key considerations when choosing the right wood for my shelves?
Consider factors like the weight capacity required, the aesthetic you’re aiming for, and your budget. Hardwoods like oak or maple often provide excellent durability, while engineered woods offer a cost-effective alternative. Also, check for any potential defects in the wood, such as knots, which could compromise the integrity of your shelves.
How do I ensure the shelves are properly installed, preventing damage or injury?
Always use appropriate tools, and take precautions to avoid accidents. Ensure the wall is suitable for mounting the shelves, and use wall anchors if necessary. Pay meticulous attention to the safety aspects of your DIY project, as this ensures the quality of the work and prevents injury. Measure twice, cut once.
In conclusion, building custom shelves is a rewarding DIY project that can significantly enhance your home’s décor and functionality. By following the steps outlined in this guide, you can confidently create unique and personalized shelving solutions. Remember to always prioritize safety and use proper tools. Now, go forth and craft those perfect shelves! For more DIY project inspiration, check out our website for more articles and tutorials! You can also subscribe to our newsletter for exclusive updates.